Skip to product information
1 of 3

Mopar

Mopar 2019-2024 Dodge Ram 2500-5500 6.7L Cummins Fuel And Oil Kit – OEM

Mopar 2019-2024 Dodge Ram 2500-5500 6.7L Cummins Fuel And Oil Kit – OEM

Regular price $69.99 USD
Regular price $149.99 USD Sale price $69.99 USD
Sale Sold out
Taxes included. Shipping calculated at checkout.
Quantity

OEM Quality 
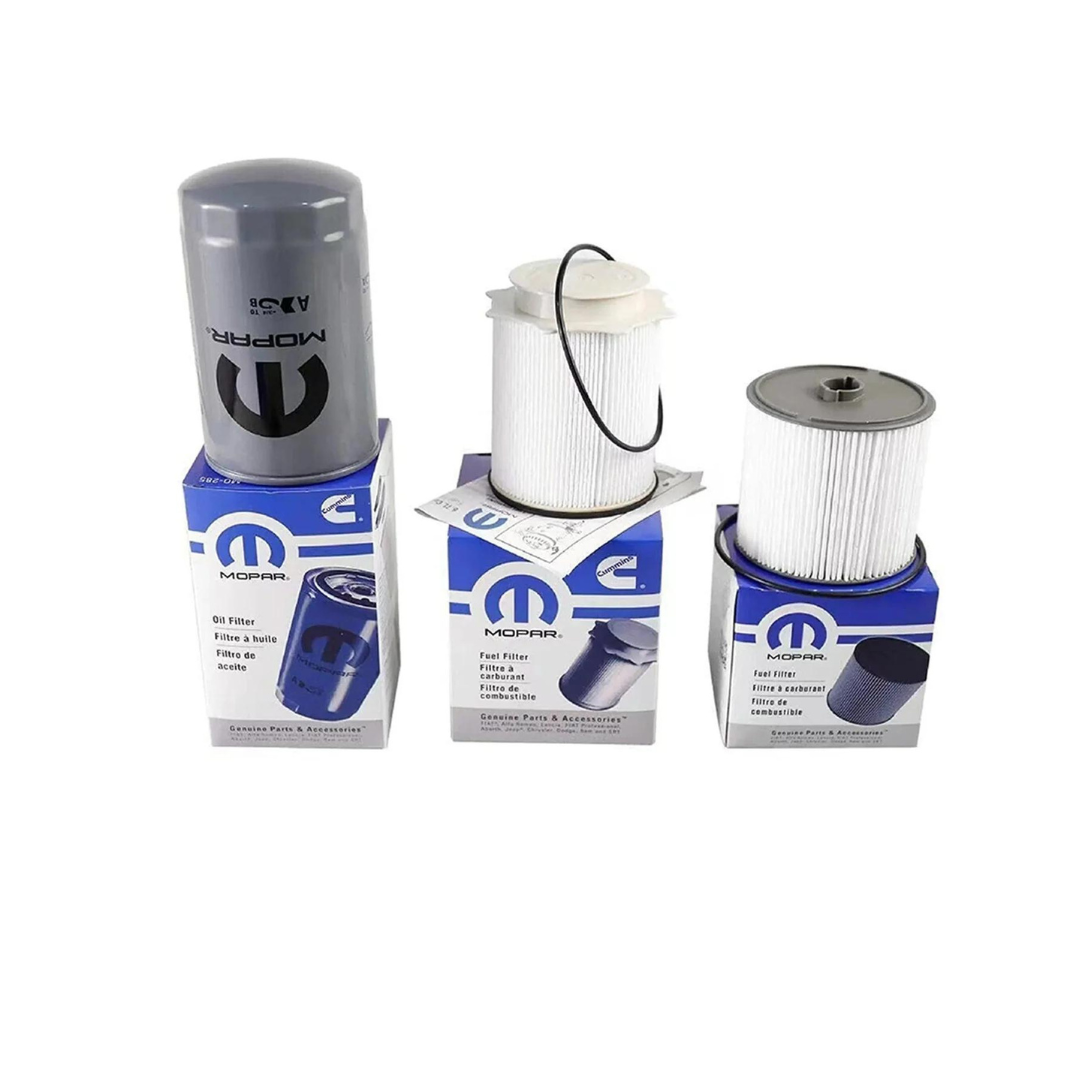
Mopar 2019-2024 Ram 6.7L Cummins Fuel & Oil Filter Service Kit

(68157291AA, 68436631AA, 05083285AA)

Stop overpaying at the dealership and protect your 5th Gen 6.7L Cummins with the ultimate maintenance solution. This all-in-one kit provides every OEM Quality Mopar filter you need for a complete fuel and oil service, ensuring factory-spec protection and peak performance for your Ram truck. This bundle is the definitive choice for the DIY owner who demands uncompromising quality and value.

  • COMPLETE 3-FILTER SERVICE KIT: Includes all three required OEM filters for your next scheduled maintenance: one engine-mounted fuel filter (68157291AA), one chassis-mounted fuel/water separator (68436631AA), and one engine oil filter (05083285AA).
  • GUARANTEED OEM QUALITY MOPAR PARTS: Eliminate the risk of counterfeit filters from questionable online sources. We supply only factory-OEM Mopar parts to guarantee perfect fitment, function, and peace of mind.
  • PROTECT YOUR HIGH-PRESSURE FUEL SYSTEM: Defend your engine's most critical and expensive components. Mopar's advanced NanoNet and multi-stage filtration are engineered specifically to protect the sensitive injectors and high-pressure fuel pump from catastrophic failure due to contaminants.
  • SAVE TIME AND MONEY: Get everything you need for your next service in one convenient box at a better value than buying separately. Empower yourself to perform the maintenance and save hundreds compared to a single dealership visit.
  • INCLUDES OUR ULTIMATE DIY INSTALLATION GUIDE: Don't just buy the parts—master the job. Scroll down for our exclusive, detailed step-by-step guide to changing all three filters, compiled from technical data and real-world owner experiences.

Vehicle Compatibility

Confirmed Vehicle Fitment

Year Make Model Engine
2019-2024 Ram 2500 6.7L Cummins Turbo Diesel
2019-2024 Ram 3500 6.7L Cummins Turbo Diesel
2019-2024 Ram 4500 6.7L Cummins Turbo Diesel
2019-2024 Ram 5500 6.7L Cummins Turbo Diesel

The Mopar Advantage

Protect Your Investment: Why OEM Filtration is Non-Negotiable

The 6.7L Cummins engine in your Ram is a significant investment, and its modern common-rail fuel system is its lifeblood. Operating at immense pressures, this system is incredibly sensitive to microscopic contaminants and water in the fuel. For 2019-2020 models equipped with the CP4.2 high-pressure fuel pump, and all subsequent models, the quality of fuel filtration is not just a recommendation—it is a critical necessity. A failure in this pump can send metal debris throughout the entire fuel system, leading to a repair bill that can easily run into thousands of dollars, requiring the replacement of the pump, fuel lines, fuel rail, and all six injectors.

Using unverified, aftermarket filters is a gamble that can have devastating consequences. OEM Quality Mopar filters are engineered by Fleetguard specifically for the Cummins engine, providing the precise micron rating and water separation capabilities required to prevent this type of catastrophic failure. This kit provides the factory-specified defense your truck needs, ensuring longevity and trouble-free operation.

Component Deep Dive

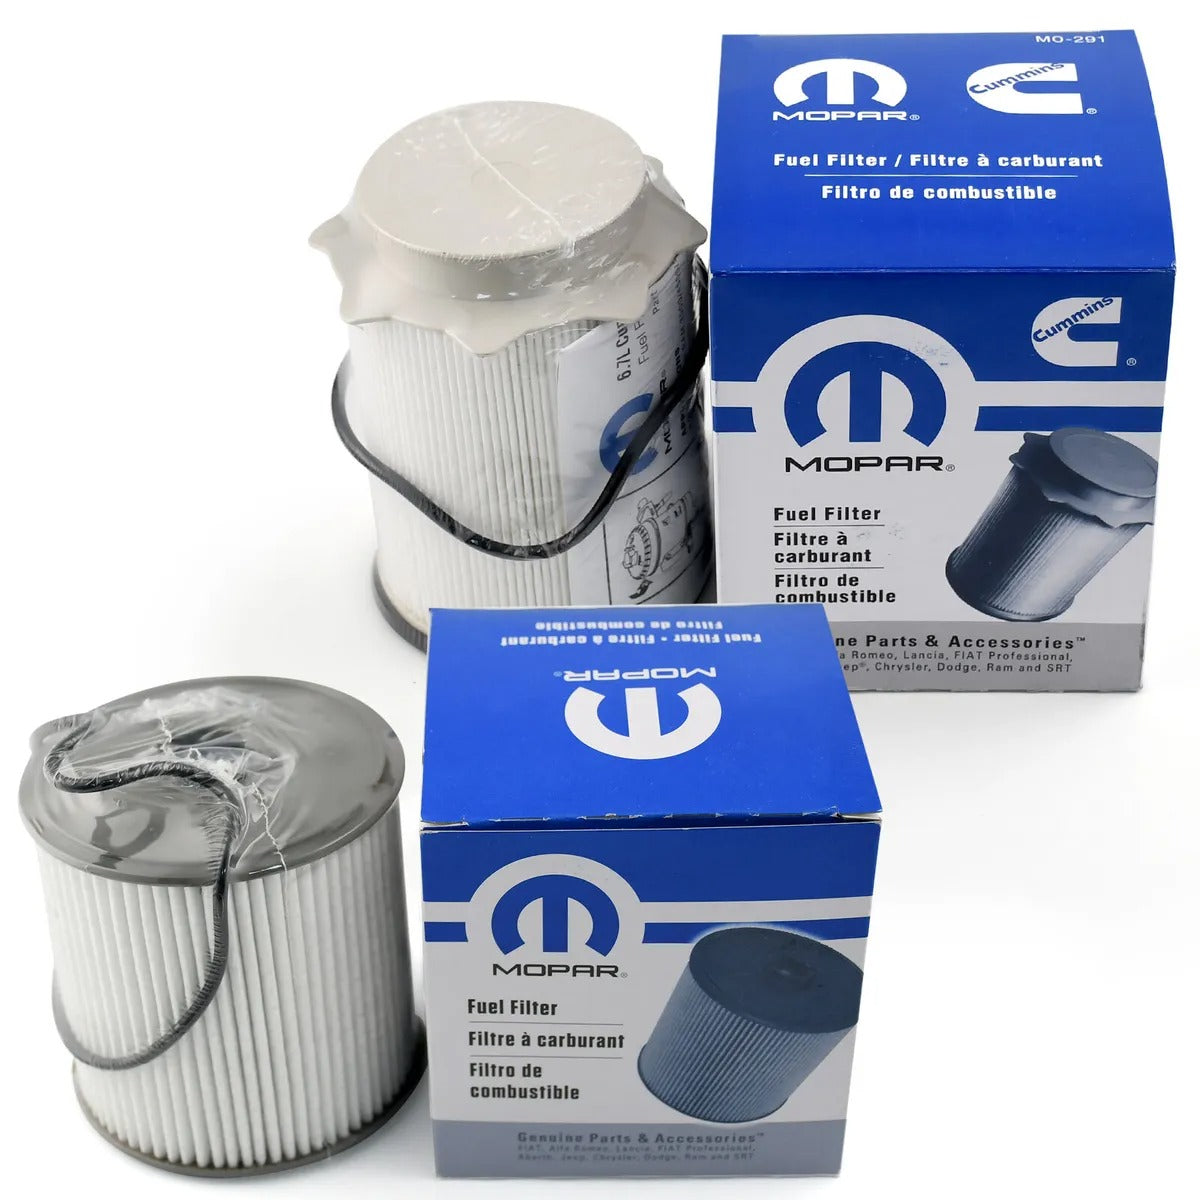
  • Engine-Mounted Fuel Filter (Mopar 68157291AA): This is the final and most crucial stage of fuel filtration. Located in the engine bay, it features advanced NanoNet technology in a proprietary two-stage design. A 5-micron outer filter captures larger particles, while a 3-micron inner filter traps the smallest, most damaging contaminants before they can reach your injectors. This level of filtration is essential for protecting the high-pressure fuel system and ensuring the longevity of its components.

  • Chassis-Mounted Fuel Separator (Mopar 68436631AA): As the first line of defense, this filter is mounted on the frame rail near the fuel tank. Its primary role is to remove damaging water and larger debris from the fuel. For 2019 and newer Ram trucks, this high-efficiency filter features a 2-micron rating, effectively stripping water from the diesel fuel to prevent corrosion and protect the entire fuel system downstream.

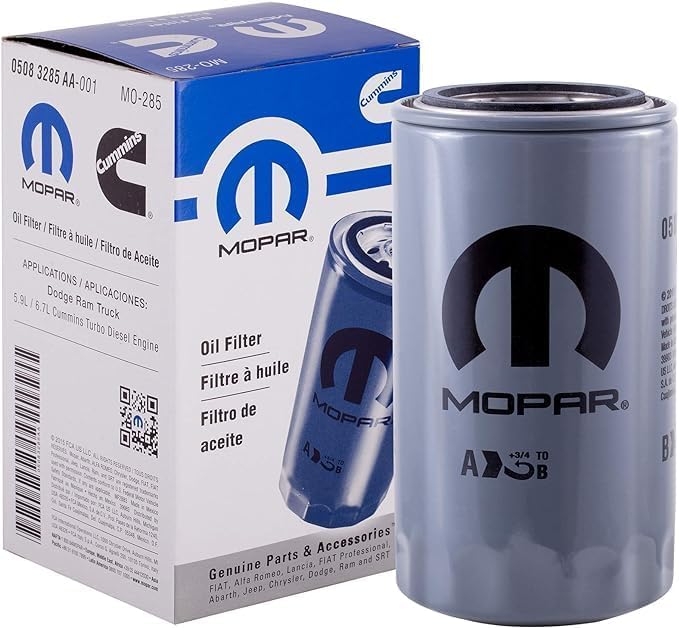
  • Engine Oil Filter (Mopar 05083285AA): A proven and reliable component, this oil filter has been the OEM choice for Cummins engines for decades. It uses high-quality cellulose media to effectively remove harmful particulates and sludge from your engine oil, preventing premature wear on bearings, lifters, and other critical internal components. While other filters exist, this Mopar filter is guaranteed to meet the OEM specifications for flow rate and filtration required for your engine's warranty and long-term health.

The Ultimate DIY Guide: 2019-2024 Ram 6.7L Cummins Filter Service

Ready to tackle your Ram's filter service? You've got this. This guide, compiled from technical manuals and real-world feedback from owners like you, will walk you through every step. We'll cover the tools you need and the pro tips to make the job clean and successful.

Essential Tools & Supplies

Tool/Supply Purpose Pro Tip / Part Number
Socket Set (Metric) General use
28mm 6-Point Socket For engine-mounted fuel filter cap A 6-point socket is critical to avoid stripping the plastic cap. Avoid 12-point sockets.
Ratchet w/ Long Extensions (10"+) To reach the engine-mounted filter cap A combination of extensions may be needed.
Swivel/Universal Joint For accessing the filter cap at an angle Highly recommended for easier access.
Oil Filter Wrench (Strap or Claw type) For chassis-mounted fuel filter & oil filter The rear fuel filter can be very tight.
Lisle 34900 Water Sensor Wrench For removing WIF sensor on rear filter Recommended by users for easy removal.
Drain Pan (Large capacity) To catch ~12 quarts of oil and diesel fuel
Shop Rags / Towels For inevitable spills
Nitrile Gloves To protect hands from diesel and oil
Safety Glasses Essential eye protection
Creeper For comfortable under-truck access
Small Bucket or Coffee Can To catch fuel from rear filter drain Can be placed on the driveshaft to minimize mess.

Procedure A: Fuel System Service (Dual Filter Change)

Part 1: Chassis-Mounted Fuel/Water Separator (68436631AA)

  1. Locate the filter on the driver's side frame rail, near the fuel tank.
  2. Place a drain pan or small bucket underneath. This can be a messy job, so be prepared.
  3. Find the yellow drain valve at the bottom of the filter canister. Open it to drain the fuel from the housing.
  4. Once drained, disconnect the Water-In-Fuel (WIF) sensor wiring harness plugged into the bottom of the filter.
  5. Using a strap wrench, turn the entire filter canister counter-clockwise to loosen and remove it. It may be tight.
  6. Carefully unscrew the plastic WIF sensor from the bottom of the old filter. A Lisle 34900 wrench is highly recommended for this to avoid damage. Clean the sensor and inspect its O-ring.
  7. Transfer the WIF sensor to the new filter canister. Do not overtighten the plastic sensor, as it can easily break.
  8. Lightly lubricate the new filter's large rubber gasket with clean diesel fuel or motor oil.
  9. Screw the new filter onto the housing by hand until the gasket makes firm contact, then tighten an additional 3/4 turn. Do not use the wrench to tighten it.
  10. Reconnect the WIF sensor wiring harness.

Part 2: Engine-Mounted Fuel Filter (68157291AA)

  1. Locate the filter housing on the driver's side of the engine, below the intake horn.
  2. To gain better access, it is helpful to disconnect the large electrical plug located directly above the filter cap.
  3. Place plenty of shop rags below the housing to catch spilled fuel.
  4. Locate the drain valve on the side of the housing. Attach a small, clear hose to the nipple and route it into a bottle to drain the housing cleanly, avoiding a mess on the front axle.
  5. Using the 28mm 6-point socket, long extensions, and a swivel joint, engage the nut on top of the filter cap. Loosen the cap by turning counter-clockwise. This cap can be extremely tight from the factory or previous service.
  6. Once loose, lift the cap and the old filter element out of the housing together.
  7. Carefully remove the old O-ring from the filter cap. This is a critical step: ensure the old O-ring is removed and not left behind in the housing groove, as a "double gasket" will cause a major fuel leak.
  8. Install the new O-ring (included with the filter) onto the cap and lubricate it with clean diesel fuel.
  9. Place the new filter element (68157291AA) into the housing, making sure it is properly seated.
  10. Screw the cap back on and tighten until snug. Do not overtighten the plastic cap to avoid cracking it.

Part 3: Critical Post-Installation: Priming the Fuel System

  1. This is the most critical step to prevent a no-start condition or limp mode.
  2. Do NOT attempt to start the engine yet.
  3. Turn the ignition to the "ON" or "RUN" position (without depressing the brake pedal) for 20-30 seconds. You should hear the electric lift pump running.
  4. Turn the ignition completely "OFF."
  5. Repeat this "ON/OFF" cycle 5 to 6 times. This process is essential for purging all air from the new filters and lines.
  6. After the final cycle, start the engine. It may run slightly rough for a few seconds as the last bit of air is cleared. Let it idle for several minutes.
  7. With the engine running, carefully inspect both the chassis-mounted and engine-mounted filters for any signs of fuel leaks.

Procedure B: Engine Oil Service (05083285AA)

  1. For best results, warm the engine for 5-10 minutes. This thins the oil and helps it drain more completely.
  2. Place a large-capacity drain pan under the engine oil pan. The 6.7L Cummins holds approximately 12 quarts of oil, and it can drain very quickly.
  3. Remove the oil drain plug and allow the oil to drain completely.
  4. Locate the oil filter on the passenger side of the engine. It is mounted upside down, which can make for a messy removal.
  5. Pro-Tip for Mess-Free Removal: To minimize spillage, place a large Ziploc bag over the filter before unscrewing it to catch the oil. Alternatively, some owners recommend an aftermarket filter drain tool that screws into the filter.
  6. Using an oil filter wrench, loosen the filter by turning it to the left (counter-clockwise when viewed from the bottom).
  7. Remove the old filter. CRITICAL: Immediately check to ensure the old rubber gasket came off with the filter and is not stuck to the engine block. A stuck gasket will cause a "double gasket" situation and a massive, engine-damaging oil leak upon startup.
  8. Wipe the filter mounting surface on the engine block completely clean with a rag.
  9. Take the new Mopar 05083285AA filter and pre-fill it about halfway with new, clean engine oil. This helps reduce the time the engine runs without oil pressure on the initial start.
  10. Apply a light film of new oil to the new filter's rubber gasket.
  11. Carefully thread the new filter onto the engine by hand until it is snug. Tighten an additional 3/4 to 1 full turn by hand only. Do not use a wrench to tighten the oil filter.
  12. Reinstall the oil drain plug and tighten it securely.
  13. Fill the engine with 12 quarts of the correct specification diesel engine oil (e.g., API CK-4 15W-40 or 5W-40).
  14. Start the engine and let it run for a minute while you check for any leaks around the oil filter and drain plug. The oil pressure light should extinguish within a few seconds.
  15. Shut off the engine, wait 5-10 minutes for the oil to settle, then check the oil level with the dipstick and top off if necessary to reach the full mark.

Procedure C: Final Steps & Resetting Maintenance Monitors

  1. With the engine off, press the ignition button twice to enter the "ON" position (do not start the engine).
  2. Use the steering wheel controls to navigate the instrument cluster display to the "Vehicle Info" menu.
  3. Scroll to "Oil Life." Press and hold the "OK" or right arrow button until the display prompts you to reset. Confirm the reset, and the life should return to 100%.
  4. Scroll to "Fuel Filter Life." Repeat the process by pressing and holding the button until it resets to 100%.
  5. Your complete filter service is now finished.
View full details